I have long admired the beauty of some alpine plants in many of the garden centres, website and gardens I have visited. My previous attempts at growing some of these little beauties have met with failure. I have concluded that the main reason is the fact that my soil is not condusive to success!!
I looked into buying some stone planters - where they could be housed - I would be able to offer the best growing medium and conditions they require and perhaps I would be a little bit more successful.
Easy if you have the budget - some of these containers can cost quite a few £££££ - money I was unwilling to spend on something without odds on certainty for success.
My research into alternatives commenced. There is a wide choice of sites out there which offer advice in relation to alpine plants. One or two I came across offered alternatives for stone pots - one was Hypertufa, whilst this does create the effect I was looking for - I don't yet feel confident enough to give it a try.
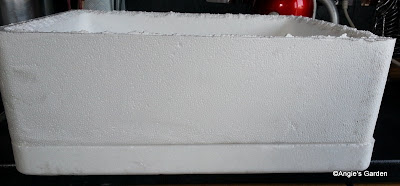
There are also many alpine growers out there who use recycled polystyrene boxes, they type which are used to store meat/fish. I thought that I'd give it a go - see what happens kind of thing. If it all goes wrong - I've not lost much other than my time......the box I sourced from a friend and the other things I had around the house/shed - top marks for the shoestring budget!!
Materials I used.......
1 x suitable sized polystyrene box/container
Choice of masonry paints - depending on colour/effect desired
Equipment I used.......
1 x pad saw/bread knife
1 x medium grade sandpaper
1 x spade drill bit (I used 16mm) and drill (obviously :))
1 x heat gun (paint stripping gun)
Clean paint brushes
Dust sheet
I would also suggest the following - a clean area to work - preferably out of wind, dust cover (when painting), something to raise your box up whilst painting.
First thing was too remove the lip which ran around the entire top edge of the box - this snapped of very easily....
![]()
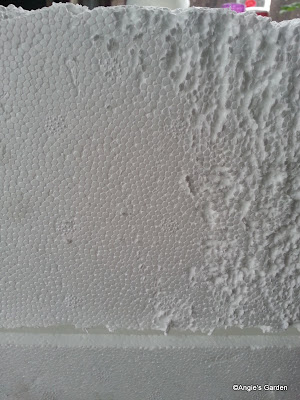
I felt it was also important to roughen up both the top and bottom edges - natural stone would not have such an even edge. Seen here resting on the lid, you are able to compare the textured edge against the machined edge.
![]()
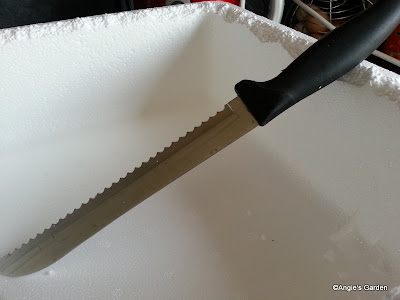
The bread knife I used to roughen up the polystyrene. A pad saw would have, I'm sure, been better but as I did not manage to find it in the shed until after I had finished this stage I made do with the bread knife!! Typical!! You could also use a hacksaw blade - with a handle created by wrapping tape around the one of the ends.
![]()
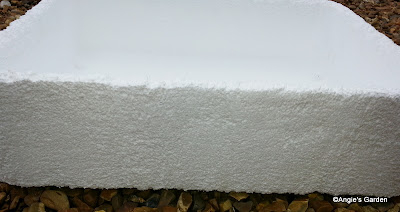
I also chose to roughen-up on the inside of the box for around 2 or 3 cm. Once the container is filled - this top bit will always be seen - I felt it added to the effect to do this.
![]()
My attention then turned to the main body of the container - I will admit at this stage - that as I had a few pieces of spare polystyrene lying around - I did a practice piece first just to get the feel and how much pressure would be needed....
![]()
![]()
![]()
From start to finish the time taken to get to this stage was around 1.5 hours. Very little effort was needed - in fact - it took more effort to clear up that it did to do :)
Stage 2 was to get the box prepared for painting.
The idea was to create a glazed surface to paint on. For this I used a heat-gun aka paint stripping tool. This section of the task should be done outdoors - as fumes can be created when the heat gun is introduced to the polystyrene. I would also advise having a wee practice on a spare piece of the material first. This will let you get a feel for how much heat is needed and how much time is required before it 'melts'. Caution is required here - I suppose I must add for health and safety reasons goggles/mask should be worn. Too much heat will also cause your piece to become very brittle and snap.
![]()
![]()
The whole thing now ready for painting.
![]()
As I only had 3 colours of masonry paint in the shed - I was limited to what I could achieve. However, as I wanted the trough to go into the gravel area in the garden I chose a beige base. This would compliment the gravel, slabs and stones already there.
The base raised up and painted. I found that 'splodging' the paint on it provided areas which were thicker. There are other sites available which would advise using a textured paint or adding sand or peat into the mix. As I had no sand or peat lying around the garden and was not prepared to buy any just for 1 box, I made do with what I had too hand!
![]()
Not forgetting that inside edge!!
![]()
After drying out for a wee while - I then added some black onto where the corners and edges would have been weathered.
![]()
The whole thing was left too dry for a good few hours - the a dry soft paintbrush was then used to 'blend' the colours together to create a 'stone' effect.
![]()
The container was left to dry completely for 2 days!
![]()
![]()
A layer of apline gravel was put into the base of the container before I added a suitable growing medium for the plants I want to grow. Before I planted it out - I gave it a good water - I let it settle for another 2 days, then topped it up.
![]()
I looked into buying some stone planters - where they could be housed - I would be able to offer the best growing medium and conditions they require and perhaps I would be a little bit more successful.
Easy if you have the budget - some of these containers can cost quite a few £££££ - money I was unwilling to spend on something without odds on certainty for success.
My research into alternatives commenced. There is a wide choice of sites out there which offer advice in relation to alpine plants. One or two I came across offered alternatives for stone pots - one was Hypertufa, whilst this does create the effect I was looking for - I don't yet feel confident enough to give it a try.
There are also many alpine growers out there who use recycled polystyrene boxes, they type which are used to store meat/fish. I thought that I'd give it a go - see what happens kind of thing. If it all goes wrong - I've not lost much other than my time......the box I sourced from a friend and the other things I had around the house/shed - top marks for the shoestring budget!!
Materials I used.......
1 x suitable sized polystyrene box/container
Choice of masonry paints - depending on colour/effect desired
Equipment I used.......
1 x pad saw/bread knife
1 x medium grade sandpaper
1 x spade drill bit (I used 16mm) and drill (obviously :))
1 x heat gun (paint stripping gun)
Clean paint brushes
Dust sheet
I would also suggest the following - a clean area to work - preferably out of wind, dust cover (when painting), something to raise your box up whilst painting.
First thing was too remove the lip which ran around the entire top edge of the box - this snapped of very easily....
I felt it was also important to roughen up both the top and bottom edges - natural stone would not have such an even edge. Seen here resting on the lid, you are able to compare the textured edge against the machined edge.

The bread knife I used to roughen up the polystyrene. A pad saw would have, I'm sure, been better but as I did not manage to find it in the shed until after I had finished this stage I made do with the bread knife!! Typical!! You could also use a hacksaw blade - with a handle created by wrapping tape around the one of the ends.
I also chose to roughen-up on the inside of the box for around 2 or 3 cm. Once the container is filled - this top bit will always be seen - I felt it added to the effect to do this.

My attention then turned to the main body of the container - I will admit at this stage - that as I had a few pieces of spare polystyrene lying around - I did a practice piece first just to get the feel and how much pressure would be needed....
Happy that I had the effect I was trying to achieve - I began the whole box - it's at this point you must be careful with the debris - doing this indoors on top of dust sheet, enabled me to gather the tiny particles which were left. A final light sanding with medium grade sandpaper removed any of those little loose bit.
The next stage was to create drainage holes (important for plants) - I used a 16mm spade drill bit on a very slow speed. Using gentle pressure (very little was needed) and taking care not to crack or damage the base at this point, I drilled through the base onto an old board I had placed underneath. The holes were then smoothed off with the end of a wooden spoon!

From start to finish the time taken to get to this stage was around 1.5 hours. Very little effort was needed - in fact - it took more effort to clear up that it did to do :)
Stage 2 was to get the box prepared for painting.
The idea was to create a glazed surface to paint on. For this I used a heat-gun aka paint stripping tool. This section of the task should be done outdoors - as fumes can be created when the heat gun is introduced to the polystyrene. I would also advise having a wee practice on a spare piece of the material first. This will let you get a feel for how much heat is needed and how much time is required before it 'melts'. Caution is required here - I suppose I must add for health and safety reasons goggles/mask should be worn. Too much heat will also cause your piece to become very brittle and snap.

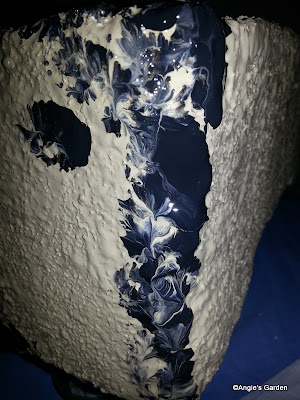
Shown here in this close-up of the corner, you can just make out the glaze over the entire surface. This is the effect you are trying to recreate.

The whole thing now ready for painting.

As I only had 3 colours of masonry paint in the shed - I was limited to what I could achieve. However, as I wanted the trough to go into the gravel area in the garden I chose a beige base. This would compliment the gravel, slabs and stones already there.
The base raised up and painted. I found that 'splodging' the paint on it provided areas which were thicker. There are other sites available which would advise using a textured paint or adding sand or peat into the mix. As I had no sand or peat lying around the garden and was not prepared to buy any just for 1 box, I made do with what I had too hand!

Not forgetting that inside edge!!

After drying out for a wee while - I then added some black onto where the corners and edges would have been weathered.
The whole thing was left too dry for a good few hours - the a dry soft paintbrush was then used to 'blend' the colours together to create a 'stone' effect.

The container was left to dry completely for 2 days!

If I had not been happy with the effect - painting over and starting again would have been easy enough - so it was a case of nothing ventured - nothing gained!!
After choosing the site I wanted - the planter was then positioned up on bricks. This will allow it to drain freely. Another tip here - whilst this is lightweight - moving will be difficult. It would be advisable to slip a couple of planks underneath to support the the base and use these to life - a 2 man or woman job here!!!!


Plants in, watered and a few stones added for 'effect - the whole thing was mulched with another layer of alpine grit.
What am I growing - I hear you ask - please subscribe and come springtime you can see for yourself ;)
As I don't have a greenhouse and my cold frame is already packed, the plants I have chose are hardy enough here in Scotland and although they have a dislike to 'winter wet' - they have been given some protection by way of a glass sheet raised on bricks. As it's all a learning curve - who knows?????
Since I have finished this I have sourced another 3 containers, work will begin soon - I've already sourced the plants - so watch this space!!
Thanks for reading.